Have you ever wondered how to make wooden toy blocks? I hadn’t until recently.
We were at my mother’s house helping frame her basement. I found my son sitting in the middle of a whole pile of wood blocks. The blocks were the cut off ends of lumber being used on the framing project. 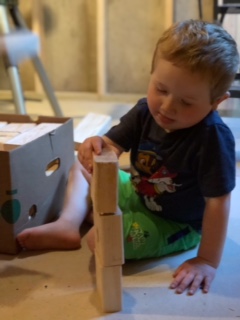
“Tell me about what you are building,” I said to my son. The three-year-old builder paused briefly from his busy work, looked up at me and said “I’m making a train.”
Of course! There were at least ten identically sized “cars” made out of lumber scraps lined up in a row.
My adult brain hindered me from recognizing the growing locomotive. Once I looked at the line of wood blocks through the eyes of a young child, I immediately understood the important project my son was immersed in.
It was at that moment, that I first wondered about making wood blocks. I was intrigued and interested because it would be a very cheap way to produce blocks for our kids to build and play with.
Read on to find out how my husband and I prepared and finished the lumber scraps to make blocks ready for the hands of the little builders in our house.
How to Make Wooden Toy Blocks
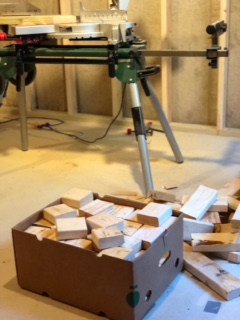
Step 1-Acquire Scraps of Lumber
You may be wondering how to find lumber to use to make blocks. There are several ways you can get your hands on the wooden material needed to make homemade blocks.
1. Use leftover scraps from your own projects. If you are building or remodeling, chances are you will have access to quite a few cut off ends of lumber
2. Contact a contractor and see if it is a possibility you can have any scraps of lumber from current building projects.
3. Go to a home improvement store or lumber yard and ask them if they have any pieces they could donate you.
4. Buy a few pieces of lumber and cut them into blocks yourself if you have the available tools to do so.
Think about people you know that may have access to lumber. I am sure there is probably some friend or acquaintance that would be willing to give you the material needed to make your child natural wood blocks.
Step 2-Prepare the Blocks 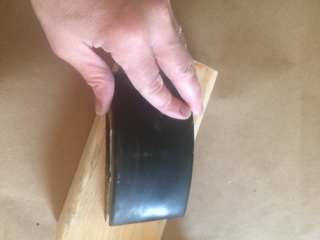
After you have acquired scraps of lumber, look them over to see if there are any longer ones you may want to cut so you have varied sizes of blocks.
The blocks we received were pretty much the same size. Since they weren’t very big, we didn’t want to cut them any smaller.
Another idea is to cut some blocks to make other shapes.
You could cut square blocks in half diagonally to make triangle shaped blocks. Or you could cut a square block into four equal pieces to make cubes.
If you have the right tools (such as a jigsaw) any shape is possible. Use your creative imagination and have fun!
After you have cut the blocks into the shapes you desire, smooth them down with sand paper.
You don’t want your child to get a splinter or other injury from the raw, rough wood.
We smoothed the roughest parts of the blocks with 100 grit sand paper and then finished smoothing them with 220 grit sand paper.
Step 3-Finish the Blocks 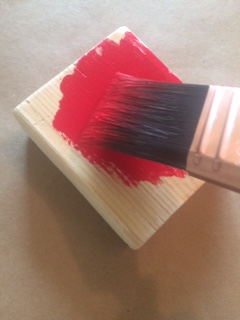
After sanding and smoothing the blocks, you have several options for finishing the blocks.
1. Don’t do anything. Leave them as is and let your child play with natural colored wooden blocks.
2. Use an oil based finish. Seal the blocks using a non-toxic plant based oil finish such as Seal It Green Extreme Bamboo Wood Sealant.
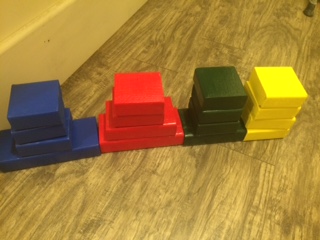
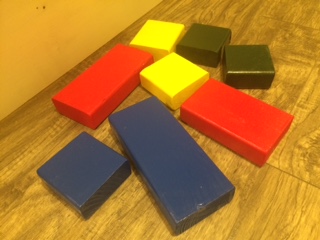
3. Paint the blocks. We used bright primary colors to paint some of our blocks so that our son had a mix of colored blocks and natural colored blocks to build with.
If you want eco-friendly blocks for your children to play with, consider painting them with Apple Barrel Acrylic Paint. This water-based paint is non-toxic and dries to a durable finish.
Painting the blocks will help your child learn colors, sorting and patterning.
Let your child help paint some blocks! He will feel more ownership and pride in the blocks if he is allowed to help make them.
4. Add designs or pictures. Paint polka dots, spirals, stripes, chevron or other designs or pictures on the blocks to add dimension and variety.
My son’s preschool teacher applied students’ photographs to wood blocks with Mod Podge.
Play with the Blocks
Children love to build long and tall structures so make sure you provide ample space for block play.
The ideal place is a large area
on a solid surface.
Our children either play with blocks on our living room
floor, the area rug in their room or on their play table. Anywhere they can find to spread out and create.
The best thing you can provide for block play is you. Let your child lead, but help design, create and build whatever your child would like.
Blocks provide the perfect opportunity for open-ended play which is so important for overall development. Playing with your children enhances their playing experience.
Share Your Blocks
When you have completed your blocks, I would love to hear how they turned out.
How did you finish them? What solution did you find to best store your blocks? Where and how do you play blocks with your children?
Take a moment to share any questions, comments, solutions and tips on how to make wooden toy blocks below. Thanks and happy building!
LIKE THIS PIN ABOUT HOW TO MAKE WOODEN TOY BLOCKS? SAVE IT TO YOUR FAVORITE PINTEREST BOARD NOW!


Hi Sharon, what an amazing idea! This captured my heart from the minute I started reading it as I love natural and eco friendly toys as too many are made of plastic these days.
The great thing about these is you can make them on a budget and they will probably lady forever being as they’re so hardy.
Love your ideas about painting them bright colours with patterns too. Kids love this kind if thing as it feeds their imagination. In fact, I would think they are great for adults too!
Thank you Stefanie! Yes, too many toys are plastic and so it is refreshing to be able to make budget friendly wooden blocks for kids to play with. And even adults as you say. Bright colors are great for kids because they are naturally attracted to them. The best thing is they are very durable and will last a long time.
All the best,
Sharon
It’s nice that the scrap wood could be put to such good use. I like how the blocks are painted different colors. When I was a child I had some blocks made out of cardboard. The were fun to play with but not nearly as nice as these are. Neat idea!
I liked being able to make blocks out of the scraps of lumber. I would not have thought of this idea on my own. Sometimes the best ideas just fall into your lap. Like this box of scraps did. 🙂
With all the cheap plastic toys and electronics available to kids these days it’s so nice to see them playing with good old fashioned wood.
Even with all the other stimulants around them it’s lovely to see the children gravitate naturally to the ‘block corner’ in the class room to design and create all manner or weird and wonderful towers, bridges and buildings.
Thank you for such a simple and cost effective idea!
Children naturally love to build with blocks. That is wonderful because it teaches so many concepts. I also like how simple and cost effective it is because easy and affordable is the mantra at our house. 🙂
I had never thought of making wood blocks for kids before this article. It really is a great way to stimulate a young child’s imagination, and could keep them occupied for hours on end. I like too that it is a relatively inexpensive, and simple project that any parent could easily undertake. I appreciate the steps, and the detail that you provide with this post. Thank you for sharing, Tom
I hadn’t thought about making wood blocks either until recently. It really was quite easy and very inexpensive. The best part is that blocks are timeless and teach kids so much.
Hello!
Very well detailed and easy to make project! I was wondering what easy things I could make for my toddler and this article has been very helpful. I love the fact that you mention a non toxic oil finish but what about the paints? Do you recommend some that would be non-toxic and durable for knocks and scratches?
Thanks you!
Good question! I will look into non-toxic paints that are durable and update the article to include that. Check back soon. 🙂
What a brilliant concept. Simple wooden blocks rather than over-priced plastic toys. This is very eco-friendly and the instructions on how to make the blocks are very easy to follow. I think painting the wood is bright primary colours is an essential step This makes something as ordinary as chips of wood exciting and alluring. Good job. I like your site.
I like this concept also. It is very simple, affordable and educational for children. Everything parents want in a toy!
Great article! I like to let my son play building blocks as I feel playing with these blocks will help them to develop their creativity. I had always bought them from stores and sometimes, they do not come in the shape and colour I want. You just gave me an idea to make these blocks myself! The best thing is I can custom them according to the colour and shape i want!
Yes, you can customize the blocks to suit your needs and desires. Colors and shapes are important concepts for children to learn. So why not include that along with the concepts of building and designing? I would love to see how your blocks turn out when you have them completed.