
“Over the ground lies a mantle of white…” The words to “Walking in a Winter Wonderland” swirl through my head as I look out the window of our Midwest USA country home today. We have at least 8 inches of the cold, white stuff and it’s still snowing. We spent part of the day making this fun snowman diorama. Later, we will bundle up and head outside to make a real snowman.
A snowman diorama is a fun way to make snowmen your kids can play with over and over this winter. It is super easy to make and uses materials you most likely have on hand. If you don’t have the exact materials you can always improvise.
We supplement our daughter’s diet with PediaSure so we have lots of those bottles available. They make the perfect body for a snowman. However, if you don’t have any, you can use a clear bottle, such as a water bottle, filled with salt or cotton balls.
Snowman Diorama
What You Will Need:
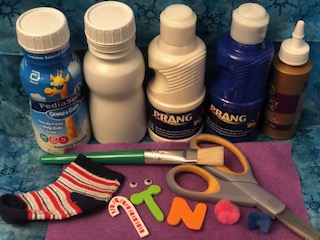
- PediaSure bottle or other white plastic bottle
- Medium sized box
- Blue and white tempera paint
- Paint brush
- Baby socks or mittens
- Small googly eyes
- Colored foam pieces
- Pom-poms
- Felt
- Blue tissue paper
- Cotton Balls
Steps for Making the Snowman Diorama
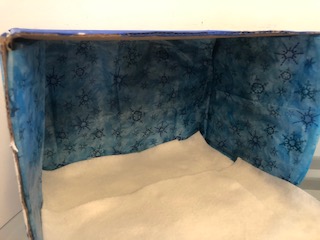
Cut and Paint the Box:
1. Cut off all but one flap of a medium-sized box. Set the box up with the bottom flap sticking out on the base of the box.
2. Paint the top and outer sides of the box with blue tempera paint.
3. Paint the inside floor of the box and the flap with white tempera paint.
4. After the box has dried, glue blue tissue paper to the inside back and sides.
5. If desired, fasten white felt to the bottom of the inside of the box to resemble snow.
Build a Snowman:
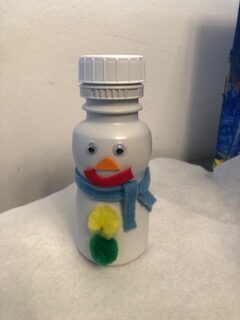
1. Use Tacky Glue to secure small googly eyes right below the lid on an empty, label free PediaSure bottle.
2. Cut out a small orange triangle and a mouth from foam pieces. (We used foam letters). Glue the nose and mouth on with Tacky Glue.
3. Cut a long, thin piece of colored felt. Tie it around the indented part of the bottle below the face. Fasten with glue if needed.
4. Glue on two colored pom-poms on the base of the bottle to resemble the buttons of a snowman.
5. Give the snowman a hat by covering the lid with a baby mitten or sock.
6. Repeat this procedure for as many snowmen as you desire to make.
Interact with the Snowman Diorama
Kids learn through role-playing and a diorama is an ideal way for them to practice. It allows them to explore and interact with the objects (in this case, snowmen) and their habitat in whatever way they desire.
Read the book Snowmen at Night to your kids (or show them this video). It has lots of fun ideas about how snowmen play together. Encourage your children to role-play what they see the snowmen do in the story.
Use cotton balls or white pom-pom balls to represent snow balls if your kids want to act out the snowball fight that took place in the story. Encourage your children to use their imaginations and find other small props they could use to role-play other games from the story. For example, perhaps they could reenact the baseball game using a small stick for a bat and rolled up paper for the ball.
The best thing about these snowmen is they won’t melt. Your children can play with them repeatedly while they are cooped up inside this winter. If they do start to fall apart, they are easy to fix. 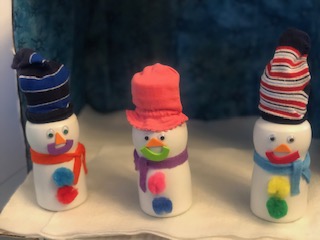
Make as many snowmen or dioramas as you would like. Remember to let your kids decide how they want to “build” their snowman or diorama. If they want to use something else for the eyes instead of googly eyes, that is fine. Kids are very creative and will come up with all sorts of interesting ways to make their own snowman unique.
After making a snowman diorama with your kids, leave a comment and let me know how it went. How did your kids make theirs unique? What recommendations or suggestions do you have?
Happy memories building snowmen both inside and outside this winter!


Leave a Reply