Inside: How to make four simple homemade baby toys using materials you already have on hand.
Your walk into your local department store with one mission: Find some toys that will be good for your baby to play with.
 Sounds simple, right? But as you walk down the baby aisle, you start to break out into a cold sweat. A zillion thoughts start pinging around in your head:
- They want how much for a rattle?
- There are so many toys to choose from, I don’t even begin to know what to get.
- Ummm….maybe my baby doesn’t really need any toys after all. It can’t be that important, right?
Stop! Wait! There is no need to panic. And there is no need to break the bank on baby toys either. There are other options available.
- Visit your local kids consignment shop. There are usually quality used baby toys there. Just make sure to sterilize them when you get home.
- If this is your first baby, sign up for a baby registry. Your friends and family are looking for ideas of items to buy for you and your little one.
- Make your own. Look around your house. You probably have everything you need to make your own toys for your baby or toddler.
In this article we will discuss four homemade baby toys that are easy to make with materials you most likely have already.
Always remember to supervise your baby or toddler while playing with any toy. Make sure each of these toys are secure before allowing your child to interact with them.
Note: This post contains affiliate links. If you click on an affiliate link and subsequently make a purchase from the linked website, I may receive a commission. Please read my affiliate disclosure for more information.
Water Bottle Rattles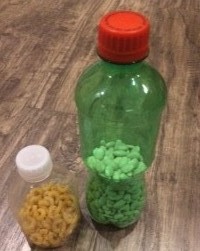
The rattle is probably the most popular and timeless baby toy.
Rattles are good for babies because they stimulate several of their senses which is good for brain development.
You can easily make your own rattle that will engage and delight your baby. My toddler loves shaking and rolling this fun toy.
What materials do you need?
- Empty water bottles that are dry inside
- Small items such as beans, rice, buttons, beads, macaroni, popcorn, jingle bells….
- Hot glue gun, super glue or other strong adhesive
How do you make it?
- Fill a water bottle half full or so with one or more of the small items.
- Secure the lid shut tightly with a hot glue gun or super glue.
Let your baby use his sense of sight, touch and hearing to explore and learn from this fun rattle. The great thing about this toy is that it is so easy to make and the possibilities are endless.
Another option:
Put water and/or oil into the water bottle along with different objects to make a sensory toy.
Hide and Seek Bottle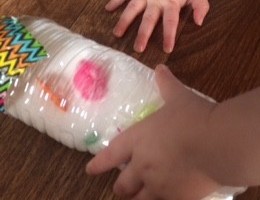
One of the homemade baby toys that’s similar to the rattle is this hide and seek bottle because it is also made using a water bottle.
The difference is that it is for older toddlers who have longer concentration and understand that the salt is hiding the objects even though they are in a bottle.
Your toddler will be able to explore making objects disappear and then reappear with this sensory toy filled with small colorful objects and salt.
What materials do you need?
- 16 oz. clear, plastic bottle
- Three or four small, brightly colored objects
- Salt
- Funnel
- Glue
- Duct or plastic tape
How do you make it?
- Allow your child to put the objects in the bottle.
- Pour salt into the bottle via the funnel, leaving about three inches at the top.
- Glue the lid on, fasten it securely, and wrap it with tape.
- Let your child roll the bottle around to view the objects and then make them disappear.
Make sure to put only three or four small objects in the bottle. I put more than that in the bottle and it was impossible to make all the objects disappear.
Another Option: Play “I Spy” with your child having her name and describe an object that she sees.
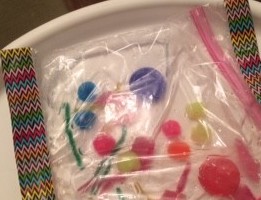
Sensory Mat
Babies learn through all their senses and understand fairly quickly that they can make things move.
Making a sensory mat is one way to help babies learn through using their sense of touch, hearing and sight.
I used this activity with my children when they were between 5-8 months old.
They enjoyed watching the objects move and feeling the movement of the water in the bag.
What materials do you need?
- 2 gallon-size zip-top freezer bags
- Bright colored objects that float (I used milk jug lids, pipe cleaner, pompoms, pieces of sponge….)
- Duct tape (I used duct tape with design and color to make it more visually stimulating)
- High chair tray or cookie sheet with sides
How do you make it?
- Fill one of the zip-top freezer bags 1/3 full of water.
- Drop in several of the bright colored objects.
- Press out as much air as possible and then zip the bag shut.
- Put the bag inside of the other zip-top freezer bag and zip shut.
- Duct tape both ends of the bag and place the bag on the tray or cookie sheet.
Now it is time to let your baby interact with this fun, watery, moving toy.
Place your baby where he or she can reach the sensory mat such as in a high chair or on the floor.
Encourage or help your child to touch or pat the sensory mat and make the objects move.
Talk to your baby about what is happening as she pats the homemade baby toy: “You are making the water move like waves. Look at the sponge move from side to side. The bag feels squishy…”
Do this activity with your baby as long as he or she is interested.
Keep the bag in a safe place and do the activity at least once a day. Doing this activity over and over helps your baby’s brain.
Make a new sensory mat if the first one becomes unsafe in any way.
Fine Motor Canister Toy 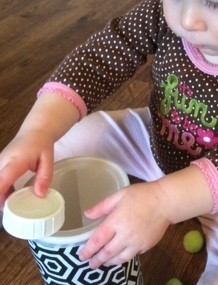
I found out recently with my daughter that some toddlers are pretty good at removing objects from a container, but not as good at putting the objects back in the container.
Toddlers need to practice picking up, inserting and retrieving objects to develop their fine motor skills.
My daughter easily mastered dumping out the objects from this canister toy, but it took longer for her to master inserting the objects through the lid opening.
This homemade baby toy was perfect for helping her practice the skill of inserting an object.
What materials do you need?
- Empty bread crumb or oatmeal container (or any other container with a plastic lid).
- The metal ends from frozen juice cans, milk jug lids, pompoms, pipe cleaner or other objects that will fit through lid opening.
- Contact paper or material
- Tacky glue or hot glue gun
- Scissors and knife
How do you make it?
- Cover the container with contact paper or material. (I used Tacky Glue to secure the material to the container).
- Cut a slit a quarter of an inch or so wide in the plastic lid.
Demonstrate to your toddler how to put the objects through the lid opening and then take the lid off to dump the contents out of the container. You may need to help your child put the lid back on the container.
Emptying the container will be easier for your child than inserting objects into the container via the lid opening.
If needed, allow your child to empty only while you insert the objects.
As your child’s fine motor skills develop, she will eventually be able to insert and retrieve.
Baby steps, baby steps!
Another option:
Use an empty baby wipes container with a built in lid with opening.
Affordable, easy and fun!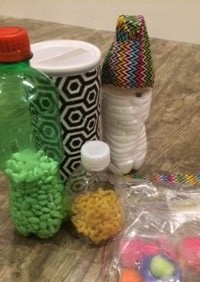
The best thing about these homemade baby toys that are easy to make is that they are super affordable. No need to break out into a sweat thinking about the price anymore.
By using supplies you already have, you can save money and help the environment.
I know you will have fun making them and your little munchkin will have a blast playing with these developmentally appropriate toys.
All of them are excellent for sensory and brain development. A definite must for any toy that your baby or toddler plays with.
Happy making and playing!!!
WANT TO REMEMBER THIS ARTICLE ABOUT HOMEMADE BABY TOYS? PIN IT TO YOUR FAVORITE PINTEREST BOARD.


Hi Sharon, thank you for sharing all these ideas!
I have a close friend who just had a baby, and sometimes i am ok with baby sitting her. Finding this homemade baby toys can be helpful for me.
All the best!
So glad to hear this is helpful to you, Hanna!
I love your ideas for home made baby toys! These are such simple concepts and yet they achieve exactly the same stimulating effects as store-bought toys. I really like that you are encouraging people to see how easy it is to entertain and stimulate babies and toddlers with toys that can be made at home – I think my favorites are the sensory mat and the canister toy. With my kids we often just let them play with the saucepans or emptied out the plastic container cupboard – add in a few pegs and they just loved putting them in, taking them, stacking everything around – it was loads of fun for them and me too! Thanks so much for sharing
Thank you, Lindsay! Letting kids play with saucepans or plastic containers is great as well and very simple. Thanks for your comment!
You are very creative to suggest all these fun toys idea without damaging our wallets without compromising on the fun factor to the toddler. Good post.
Thank you Jeffrey! I appreciate your comment.